

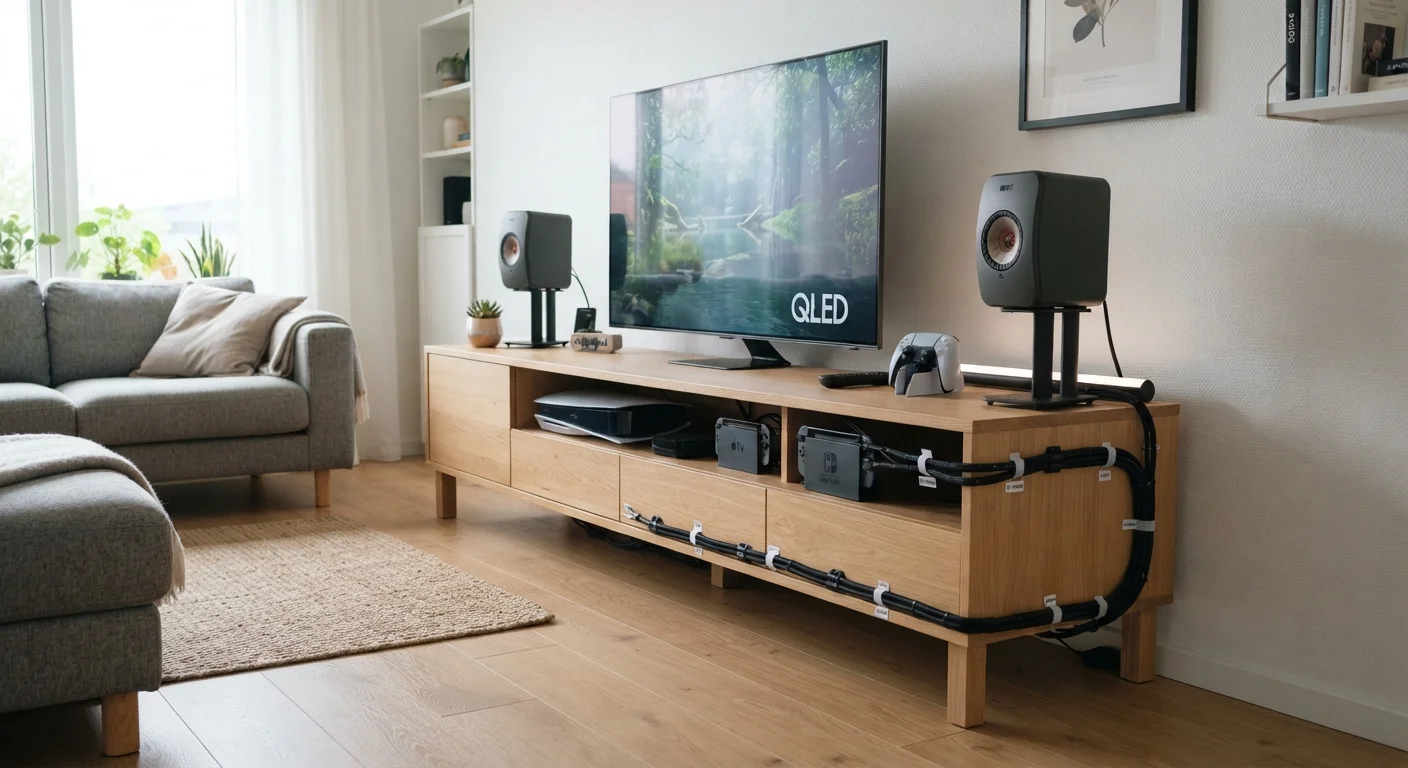
Key Takeaways
- Planning cable routes before buying supplies saves time and prevents costly rework.
- Reusable velcro ties are safer and more flexible than zip ties for bundling cables.
- Labeling cables at both ends is one of the highest-value habits in any tech setup.
- Routing ethernet along baseboards avoids drywall work and keeps connections reliable.
- A mix of low-cost clips, channels, and cable boxes handles most home scenarios.
What you will need
Why Cable Management Matters More Than It Looks
A tangle of cables isn't just an eyesore. Loose, unmanaged cables can be tripping hazards, make troubleshooting nearly impossible, and in worst cases - when power cables are pinched, coiled too tightly, or trapped under furniture - can create heat buildup. Good cable management is a safety and reliability practice as much as an aesthetic one.
The good news: you don't need to run cables through walls or hire a professional to get dramatically better results. A combination of planning, the right low-cost supplies, and consistent habits handles most tech-heavy home setups. Whether you're managing an entertainment center, a home office, or a gaming corner, the principles are the same.
What you will need
Velcro cable ties (reusable)
Bundle grouped cables together without the permanent bite of zip ties, making future changes easy.
Adhesive cable clips or cable raceways
Secure individual cables or bundles along walls, desks, or baseboards without drilling.
Cable management box or sleeve
Conceal a power strip and excess cable length at a single source point.
Label maker or adhesive cable labels
Identify each cable at both ends so you can trace or swap connections without guessing.
Tape measure
Measure cable runs accurately so you buy the right cable lengths and avoid excess slack.
Cable clips with adhesive backing
Route single cables along furniture legs or desk edges with minimal hardware.
Step-by-Step: Organizing Your Cables
Follow these steps in order. Skipping the planning stages - particularly the mapping and measuring steps - is the most common reason cable management projects have to be redone. A little patience upfront pays off every time you sit down to use your setup.
Map your devices and power sources
Before touching a single cable, draw a rough sketch of the room. Mark every device - TV, router, game console, streaming stick, desktop - and note where wall outlets and ethernet ports already exist. This gives you a visual "cable map" that exposes obvious problems: an outlet on the wrong wall, a device too far from the router, or a path that crosses a doorway.
Decide at this stage which devices genuinely benefit from a wired ethernet connection versus Wi-Fi. If you're unsure, the Wired vs. Wireless Home Networks guide explains where each option has a real edge.
Measure runs and buy the right cable lengths
Use your tape measure to follow the actual path each cable will take - along the baseboard, up a desk leg, around a corner - not just the straight-line distance. Add about 10-15% extra length to allow for gentle curves and future repositioning. Buying cables that are slightly too long is far better than ones that are too short and pull taut.
For HDMI, cables over roughly 15 feet may need to be active (powered) to maintain a reliable signal. For ethernet, standard Cat 5e or Cat 6 cable handles most home needs up to 328 feet - well beyond what any room requires.
Bundle and group cables by type
Before routing anything, sort your cables into logical groups: power cables together, signal cables (HDMI, DisplayPort, audio) together, and data cables (ethernet, USB) together. Use reusable velcro ties to loosely bundle each group. Avoid mixing power and signal cables in the same bundle - running them in parallel can introduce electrical interference that degrades audio and video quality.
Route cables along natural edges and surfaces
The cleanest cable runs follow the room's natural geometry: along baseboards, under desk edges, behind furniture, or inside adhesive cable raceways mounted on the wall. Raceways are paintable plastic channels that snap shut over cables and blend with most wall colors - no drilling required for the basic adhesive versions.
For a home office setup, routing cables down the back of a desk and into a cable management tray underneath keeps the work surface clear. See the Home Office Tech Setup guide for placement considerations specific to that environment.
Conceal excess length and power strips
Even well-measured cables leave some slack, and power strips are among the most visually chaotic elements in a tech setup. A cable management box - an open-top box that sits on the floor or desk - hides both. Route cables in through a side opening and close the lid. The power strip lives inside; only clean, routed cables exit toward devices.
For excess cable length behind a desk or entertainment center, use a wide, loose loop secured with a velcro tie and mount it out of sight behind the furniture.
Label every cable at both ends
This step is frequently skipped and universally regretted. Once cables are routed and bundled, identifying them individually becomes very difficult. Label each cable at the device end and at the power/source end using a label maker or adhesive flag labels. Use short, clear names: "TV - HDMI 1", "Router - Ethernet Port 3", "Monitor - Power".
Labeling takes about 10 minutes and saves hours the next time you need to swap a device, troubleshoot a connection, or move furniture. It also makes the complete home network setup guide far easier to act on if you expand your setup later.
Start Small, Then Expand
If a full-room cable management project feels overwhelming, pick one area - the entertainment center or your desk - and do it properly. A single well-organized zone builds the confidence and habits to tackle the rest. Momentum matters more than perfection on day one.
If your setup includes a mix of wired and wireless connections, unfamiliar terms like DHCP, ethernet handoff, or switch may come up. The Home Tech Glossary defines these in plain language so you can move forward without guesswork.
Keeping It Organized Over Time
Cable management isn't a one-time project - it requires a small amount of ongoing discipline. When you add a new device, route and label its cable immediately rather than letting it sit loose temporarily (temporary almost always becomes permanent). When you remove a device, pull its cable rather than leaving orphaned wires in the bundle.
Revisit your setup every six months or so: check that adhesive clips are still holding, verify that no cables have been pinched or bent sharply, and update labels if anything changed. A setup that takes 10 minutes to maintain twice a year stays clean indefinitely.
Don't Trap Cables Under Furniture
Running power cables under rug edges or beneath furniture legs is a common shortcut that damages insulation over time and creates fire risk. Always route power cables along open paths where they won't be compressed. If a cable must cross a floor, use a low-profile cord cover rated for foot traffic.
For readers building out a broader home network alongside this - adding a switch, access points, or structured wiring - the Complete Home Network Setup Guide covers how all those elements connect into a cohesive, manageable system.